Wiring extra headlights
If you are using lights that draw more power than the original wiring was designed to cope with, you need to use thicker wires.A relay will allow you to use those thicker wires while retaining the original wiring on the bike.A relay is essentially an electrically controlled switch. Putting power through the relay activates a small electromagnet which either opens, closes or changes the position of another switch.
The important thing here is, the power required to activate the electromagnet is very small but the switch it activates can cope with much more power.So you use the original wiring to activate the electromagnet in the relay. This in turn switches on the lights using your new, thicker wires.
The simplest way with a normal dip and beam lighting system is to use two, normally off four pin relays. This is a simple switch, it's off when there is no power being applied to the electromagnet and it's on when power is applied.
So. Get your thick wire and attach it to the battery. Fit an appropriate sized inline fuse in this wire and attach it to terminal number 30 of both relays. This is your new power supply to the lights.
Get another piece of thick wire and attach it from the "dip" relays terminal 87 to the "dip" pin on your headlight. When the relay is activated, it connects terminals 30 and 87 together and the light comes on.
Now you need to activate the relay. To do this you connect a thinner piece of wire (it can be thick too but it isn't carrying much power) from the wire that was originally powering the dip beam on your headlight and attach it to terminal 85 on the relay.
Do the same for the "Full beam" relay, thick wire from 87 to the full beam pin of your headlight and a thin wire from the full beam on the wiring loom to terminal 85 of the relay.
Now. It's an electrical circuit and to be a circuit it all needs to connect to earth. So you need a thick earth wire connected to either a bare piece of frame or the negative terminal of your battery. This attaches to the earth pin on your headlight (there should only be one left) and to terminal 86 on both relays.
If you post the power and number of bulbs you have, I or someone else will tell you what size fuse to use and how thick the wire needs to be.
You can mount the relays anywhere you want but for neatness, tucked up behind the headlamp somewhere is popular because it is close to all the connections and uses less wire.

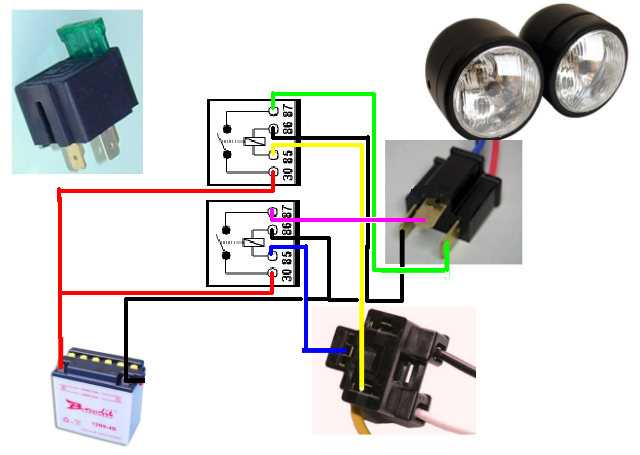
The diagram to the left shows all this. The two square things in the middle are the relays showing the pin numbers (this is a universal numbering system, pin layouts can vary but they are usually numbered). The thing in the top left is what the relay looks like (that one has a built in fuse, others are unfused). Bottom right is the connector on the wiring loom that normally attaches to the headlight. Middle right is the connector on the headlight itself.
Once again. You want a 4-pin, normally open, automotive relay (sometimes abbreviated to SPNO:- single pole, normally open). If you're unsure, check it has four pins on it numbered 30, 85, 86 and 87. Most are rated for 30 or 40 Amps which is more than enough for motorcycle headlights.
The important thing here is, the power required to activate the electromagnet is very small but the switch it activates can cope with much more power.So you use the original wiring to activate the electromagnet in the relay. This in turn switches on the lights using your new, thicker wires.
The simplest way with a normal dip and beam lighting system is to use two, normally off four pin relays. This is a simple switch, it's off when there is no power being applied to the electromagnet and it's on when power is applied.
So. Get your thick wire and attach it to the battery. Fit an appropriate sized inline fuse in this wire and attach it to terminal number 30 of both relays. This is your new power supply to the lights.
Get another piece of thick wire and attach it from the "dip" relays terminal 87 to the "dip" pin on your headlight. When the relay is activated, it connects terminals 30 and 87 together and the light comes on.
Now you need to activate the relay. To do this you connect a thinner piece of wire (it can be thick too but it isn't carrying much power) from the wire that was originally powering the dip beam on your headlight and attach it to terminal 85 on the relay.
Do the same for the "Full beam" relay, thick wire from 87 to the full beam pin of your headlight and a thin wire from the full beam on the wiring loom to terminal 85 of the relay.
Now. It's an electrical circuit and to be a circuit it all needs to connect to earth. So you need a thick earth wire connected to either a bare piece of frame or the negative terminal of your battery. This attaches to the earth pin on your headlight (there should only be one left) and to terminal 86 on both relays.
If you post the power and number of bulbs you have, I or someone else will tell you what size fuse to use and how thick the wire needs to be.
You can mount the relays anywhere you want but for neatness, tucked up behind the headlamp somewhere is popular because it is close to all the connections and uses less wire.
The diagram to the left shows all this. The two square things in the middle are the relays showing the pin numbers (this is a universal numbering system, pin layouts can vary but they are usually numbered). The thing in the top left is what the relay looks like (that one has a built in fuse, others are unfused). Bottom right is the connector on the wiring loom that normally attaches to the headlight. Middle right is the connector on the headlight itself.
Once again. You want a 4-pin, normally open, automotive relay (sometimes abbreviated to SPNO:- single pole, normally open). If you're unsure, check it has four pins on it numbered 30, 85, 86 and 87. Most are rated for 30 or 40 Amps which is more than enough for motorcycle headlights.
Scott - UK
 Important Disclaimer
Advice given in this section may or may not be accurate, safe or wise. Always use common sense and when in doubt assume that any advice given herein is incorrect and liable to end in terminal engine or part failure and possible injury or death. www.ratbike.org and its contributors can accept no responsibility for anything, anywhere, regardless of cause.
